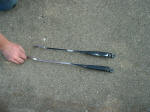
Before:


After:


Needed:
Tools:
Sandpaper (220 grit works
well)
Large cloth or something
else to prevent overspray
Materials:
Rattle-can Primer
Rattle-can Paint
Instructions:
Step 1:
Remove the wiper
arms.
Step 2:
Remove the wiper blades
Step 3:
Sand. I used a mouse-style orbital sander, but you
can do it manually as well. 220 grit sandpaper got
things pretty smooth, and didn't take too long to do the
job. You'll want to get any rust or rough spots
completely sanded down. The rest, just got over a
little to rough up the paint and help the new primer and
paint stick to it.

Step 4: Prime. Painting
these things is much easier if you can hang them from
something. My friend & I worked together on this, and
decided to hang them from the opener release cord on my
garage door, using an extra-long twist tie I had. This
resulted in only a very small area that paint couldn't
touch. It also helped with drying. To protect
from paint getting everywhere, my friend held up a large
towel (already in "rag" status) on the other side of the
wipers from where I was painting. Make sure they
aren't touching each other. I recommend painting both
at the same time for consistency in the paint job. I
used a Dupli-Color sandable primer, but there's not much
need to be picky here.


Step 5: Paint. Make
sure you've let the primer dry. You should probably do
a few coats of paint and let it mostly dry between coats.
Painting is pretty much the same as priming. I used a
Krylon semi-flat indoor/outdoor paint, but again, not much
need to be picky.
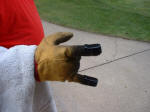
Step 6: Paint the plastic
caps. Painting the plastic nut caps helps keep
the whole assembly looking consistent. We
just put them on the fingers of an old glove, and covered
his arm with the towel (damp paint side folded inside), and
I sprayed. Very easy.

Step 6: Let it dry, then
reassemble.